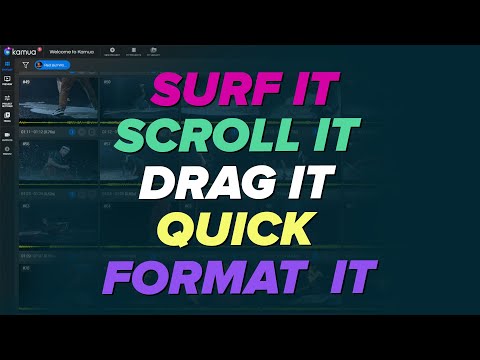
Kamua boasts an arsenal of game-changing online tools for automated video editing, built to save creators time and money.
☕️ TL;DR: we have lots of awesome tools and you should be A/B testing your social cut-downs. If you already knew that, skip to the list of tools. Or, read on. 🤩
Let’s face it, video is through the roof. Brands are in a relentless battle to get thumbs to stop and eyeballs to engage. With that comes the challenge of keeping up with the competition, and finding alternatives to Adobe and other established video apps, whose workflows aren’t really designed for repurposing, remixing, and resizing videos. One way to keep the content flowing is to repurpose existing content that you already uploaded to YouTube, and create cut-downs (shorter versions) to fit today’s mobile vertical formats.
If you’re not A/B Testing Video, you’re missing out
At Kamua we want to equip content creators, brands, and marketers with the latest in AI-powered video tools, that will reduce costs and create efficient workflows to handle the high volume of videos required to not only stay ahead of the game, but to A/B test multiple versions of social cut-downs to see which ones work the best on which platforms. Our base tier is free (watermarks) and our intro package is $1.99/mo for 10 watermark removals each month.
Our promise: No heavy software. No powerful computers required. No prior mastery. Kamua is all about Friendly AI automation tools to help you do tedious, difficult and time-consuming edits up to 10x faster than with other editing apps, and to get more out of your existing content.
Below, we break down all the tools you need to change your game!
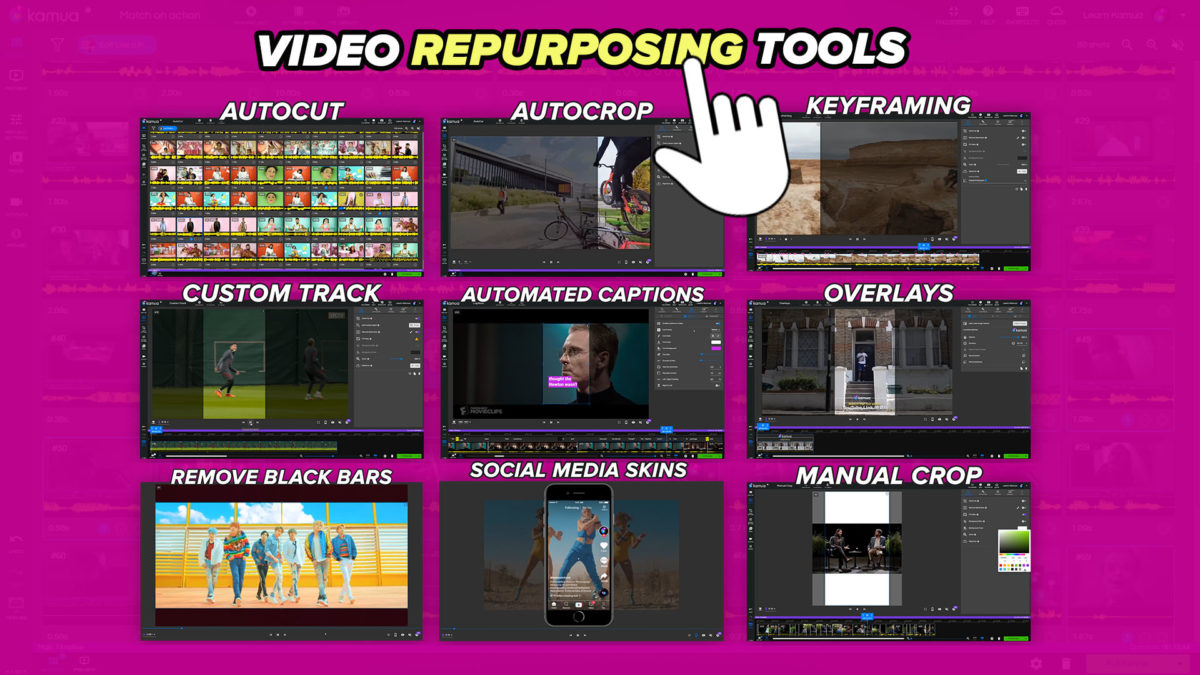
https://kamua.com/blog/wp-content/uploads/2021/06/AutoCut.mp4AutoCut detects the cut points in videos and automatically splits the video at each cut point, saving you valuable time. The resulting “pieces” of the video are called Shots and can be split further or merged according to what you need.
https://kamua.com/blog/wp-content/uploads/2021/06/AutoCrop.mp4If your video contains action sequences, people or objects that are not in the center of the video and you need to crop the video for a mobile format, you can use AutoCrop to crop the entire video or just the Clips that have movement.
https://kamua.com/blog/wp-content/uploads/2021/06/Keyframing.mp4Motion KeyFraming allows you to set the position and size of the Crop Box at specific points in your video, giving you full creative control. This enables you to create panning and/or zooming effects with precision and accuracy.
https://kamua.com/blog/wp-content/uploads/2021/06/Manual-crop.mp4Manually Cropping your video in Kamua is as easy as choosing an Aspect Ratio and moving/resizing the Crop Box anywhere on the screen. You can also fit the entire video into the Crop Box and use the Zoon Slider to adjust the video size.
https://kamua.com/blog/wp-content/uploads/2021/06/AI-Builder.mp4Our AI Builder allows users to quickly set the parameters (like Duration, Aspect Ratio, Scene Shuffle etc) for their desired output and Kamua does the rest. This is a great tool for rapid prototyping or Idea generation.https://kamua.com/blog/wp-content/uploads/2021/06/TinyVid.mp4Set your desired file size and TinyVid will make it happen. TinyVideo is built to solve a very modern headache: getting a video to fit a file size limitation.
Hey, why not try it out for yourself—just sign up for free on our Home Page. Get ready to have your mind blown by how much time these powerful tools will save you!
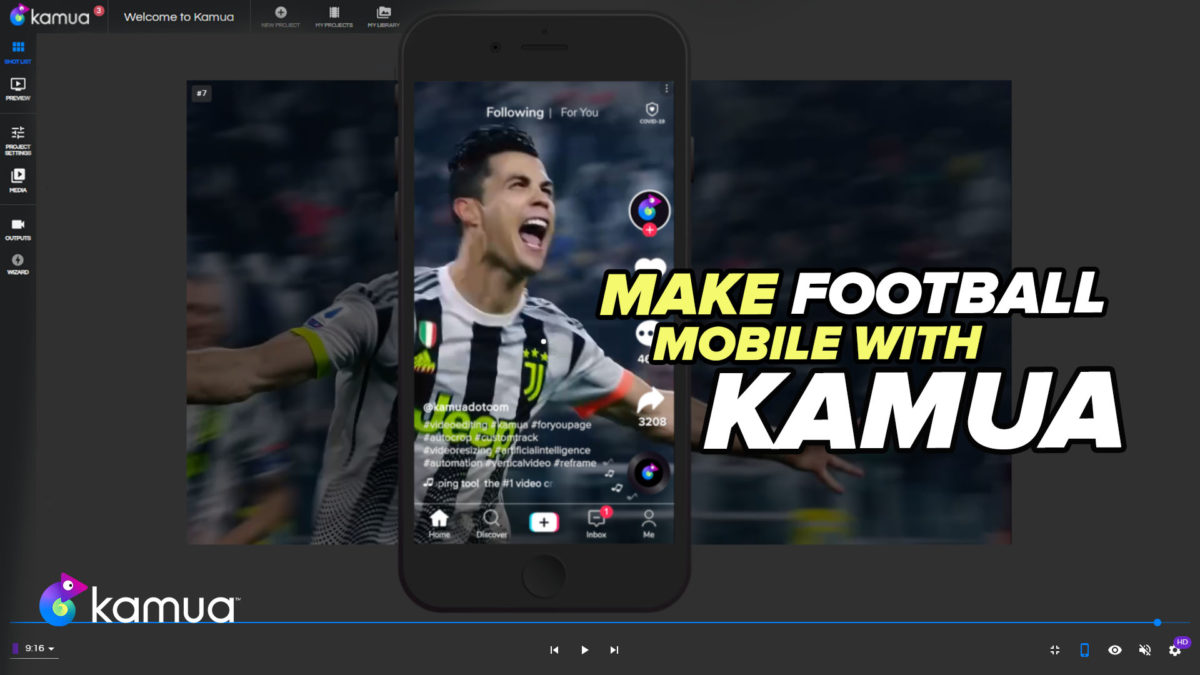
With vertical video exploding in 2021 with the likes of TikTok, YouTube Shorts and Instagram Reels, is now the time for the beautiful game to fit our mobile screens?
Yes, it is!
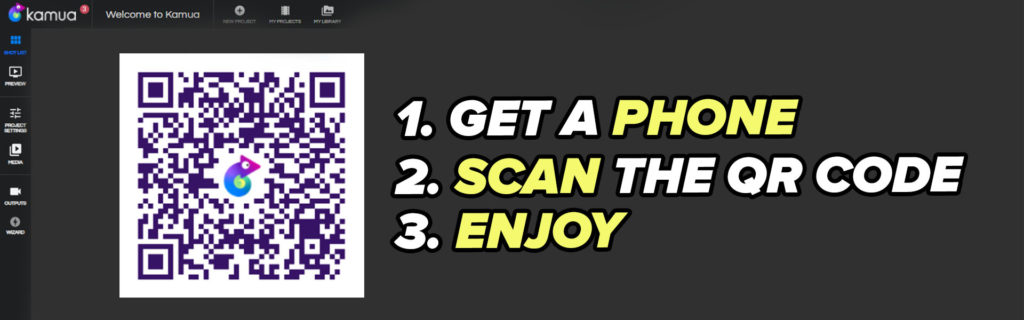
Scan the QR code to watch the goal above on your phone
Football’s coming home
The pandemic hit the sports world hard! No cheers, just empty seats and empty stadiums…Football really did come home in 2020. With almost every football league around the world suspended, fans were left with limited options like watching classic football games or escaping to social media for some memes.
Twenty of Europe’s biggest clubs lost more than €1bn in revenue over the past year while almost 10% has been knocked off players’ average values as the game struggles with the economic impact of the Covid-19 pandemic, according to a study by the market analyst KPMG.
The Guardian
Clubs had to get creative and find a way of staying connected to their fans. Many started taking their social media channels more serious and the game became shooting for likes, tackling comments and stopping the scroll. Fans can now go behind the scenes and see their club’s training games, early highlights and some hilarious content.
The gooooal is now vertical
With the demand to make more football content than ever, Kamua is a no brainer. It’s the most versatile, AI browser-based tool for repurposing videos to date. Kamua is equipped with the ability to automatically track the subject in a video using AutoCrop and apply KeyFrames to help the creator control the motion manually. These powerful tools combined, offer creators the ability to crop the fast-paced action of football into the vertical 9:16 aspect ratio, all in a web browser. Easy😎.
To make finer adjustments to the position of your crop box, add a KeyFrame at the point you want to tweak and another where you would like it to stop. Move the Crop Box to the last KeyFrame and you’re done.
You can repeat this process on as many Clips as you like on the Timeline.
Share with the fans ⚽
Keep up using Custom Track
Football has many moving parts and part of the challenge with vertical video is choosing who or what to focus on. With Kamua you can utilise tools like CustomTrack to help you test and speed up these decisions. In the short video below you can see how easy it is to change which player AutoCrop tracks by simply applying Custom Tracking.
With so many viewers watching content on mute, Captions are now a must-have! Not to worry, Kamua’s auto-generated Captions are all you need. Creators can easily tweak the Captions right on the Timeline, change the style, colours and choose from an extensive font selection to make sure videos stay on brand.
In addition, the amazing Social Media Skins feature allows you to see where the captions would look best across various social media platforms. This is a game-changer! No more guessing and exporting only to find that TikTok’s UI got in the way of your Captions.
With Kamua, football clubs’ social media managers can now enjoy a lightweight experience of repurposing content. All they need is a link and Wifi 👌.
Gone are the days where fancy, labour intensive animated graphics are needed to wow the viewers. Like the TikTok video above shows, people want organic content that’s straight to the point. Kamua is designed to make it easier to find those moments and repurpose them to share with the world.
Hey, why not try it out for yourself—just sign up for free on our Home Page. Get ready to have your mind blown by how much time this powerful tool will save you.
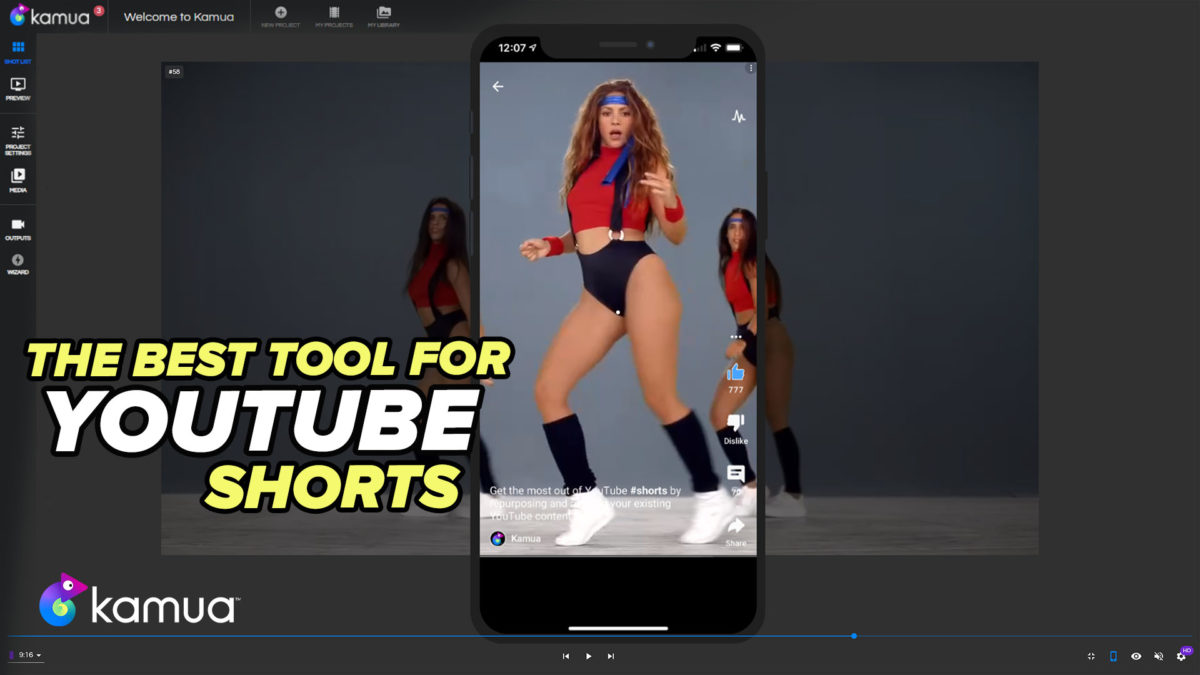
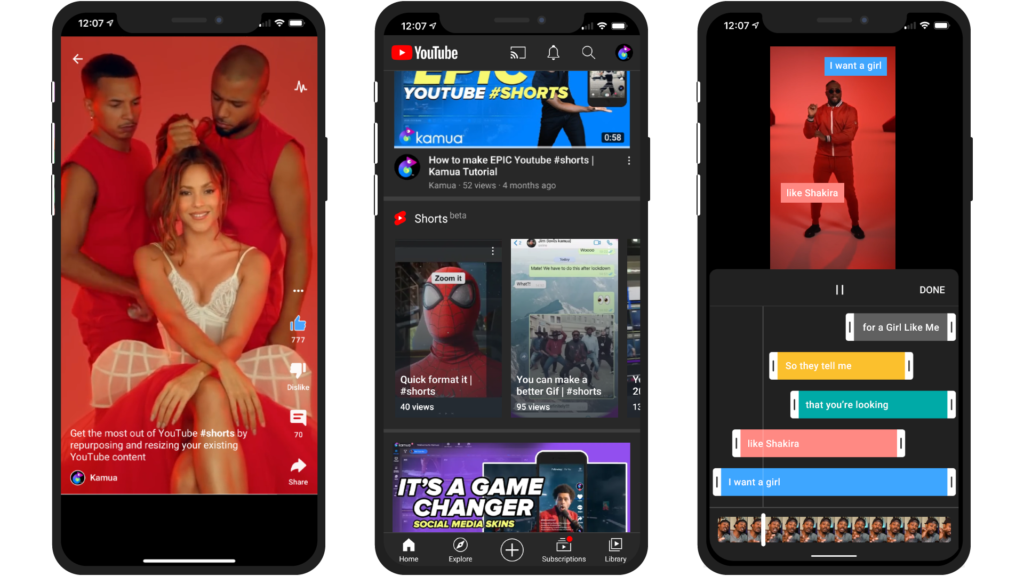
The battle for vertical video is heating up following the launch of YouTube Shorts (Beta) in the U.S
Vertical videos used to be considered a phase that would pass, a gimmick or a niche for those too lazy to flip their phones landscape. But with TikTok boasting over 600 million monthly active users worldwide, even the video juggernaut that is YouTube said “Whoa”. With the competition heating up, Kamua is the perfect tool to help you grow on YouTube Shorts.
But first…
What are Shorts?
Shorts are YouTube ‘s answer to TikTok. It’s short-form video content for anyone who wants to create short, catchy videos using nothing but their mobile phones. After TikTok was banned in India (as of June 2020), YouTube seized this opportunity to trial their Shorts app there and are now seeing the number of Indian channels using the tool tripling since the beginning of December alone. “Whoa” 😲
Fundamentals of a YouTube Short:
Although the stand-alone app is not yet available outside the U.S. you can still make Shorts by creating your content outside the platform and uploading them the traditional way, as long as they meet the following criteria:
Must be vertical
60 seconds or less
Include #shorts somewhere in the description or title to increases virality & to be found by YouTube’s algorithm
Engaging (okay that’s just a recommendation 😁)
YouTube Shorts example
Why should you care?
You should care about YouTube Shorts if:
You want to stay ahead of the competition
You don’t want to be left behind on the next big platform
You care about future-proofing your content
You want to capture a new untapped audience
You create content
You want to grow your following
You find this a no brainer considering it’s going to be huge regardless of whether you think YouTube doesn’t need to become another TikTok clone😁
How to Create a YouTube Short
Kamua was built to help you future proof your content. How? Well, we’re here to help you repurpose your videos. Experiment with ideas by creating YouTube Shorts from your existing YouTube library. Our tools are there to guide you through the vertical content creating universe. Turn your landscape videos into dynamic vertical videos within minutes. 👇😎
How to make a YouTube Short with Kamua
Wait! There’s more…
You can now preview what your video will look like on YouTube Shorts using Kamua’s Social Media Skins. This game-changing feature is great for making sure things like Captions and Overlays don’t interfere with the YouTube Shorts user interface. 👇🤯
Preview your video with Social Media Skins
Hey, why not try it out for yourself—just sign up for free on our home page. Get ready to have your mind blown by how much time this powerful tool will save you.
Did you find this post helpful? Check out article on how to Turn your Youtube videos into TikTok videos. Please consider subscribing to our YouTube channel for more helpful tips and tricks on how you can get the most out of YouTube Shorts.
Sometimes taking hours and hours to obsess over small details is what transforms a video from good to great and is the mark of a professional. But quite often, a lot of time is wasted doing tasks that just require more time, not more skill or more artistry.
Fully automated cropping with the ability to manually fine tune as you go
And, editing video as a profession can be very difficult. Software crashes. External drives pile up in boxes or get borrowed. Files saved on Macs lose their links when opened in Windows. Clients and producers demand miracles (“we’ll fix it in post”), have unrealistic ideas of how long things take (“by Friday, right?”), and how easy or difficult things might be (“can’t we just get a 9:16 cutdown for social?”), are prone to changing things too often (“no actually I prefer the previous version”) and don’t have much patience (“what do you mean it’s still exporting?”)
If you have often thought “I wish there was just some way to automate this,” chances are Kamua is what you need.
– Jim Harrison, Pro Video Editor and Kamua Product Specialist
Where professionals get the most benefit out of Kamua is by using our online browser tools that automate some of the most time-consuming parts of production.
Kamua AutoCrop uses AI to track objects and resize video.
When you are looking to rapidly convert video from the original landscape (16:9) format into a more “social media friendly” format (9:16, 4:5, 1:1), Kamua offers you the fastest possible way to get it done.
AutoCrop is designed from the ground up to generate multiple aspect ratio outputs from the same focal point.
We built our own in-house AI to automatically detect a focal point and to follow that focal point the way that a videographer or DOP would follow it. If you’re making a Hollywood-style movie trailer crop, you may end up liking half of the automated crops and decide to do the rest manually (which you can also do in Kamua). But if you’re making a quick social media cut, you may end up going with 90% or more of the automated crops, because time is a critical resource and you may want to spend more time on skilled and artistic things like animated overlays, sound design and other things you wish you had more time for in a project.
“Being able to not only resize a video on the fly but to have the captions resize at the same time to fit into that aspect ratio is a game changer for editors who repurpose video for social.” – Arthur Sempebwa, Pro Video Editor and Kamua Product SpecialistTweet
To see how it’s done in detail, check out our Knowledge Base article about AutoCrop.
This is pretty simple, right? You have a client who wants you to crop something specific from a video like a TV broadcast, and they want you to track the action and make it “look native” on a mobile. CustomTrack can be really helpful to you. Even if you are just looking to do a quick proof of concept for the client to approve, you can put that together fast in Kamua by clicking and dragging a box around the subject, object or region you want to track.
To see how it’s done in detail, head over to the CustomTrack article in Kamua.
There are many instances where AutoCrop and CustomTrack won’t do everything right, for several possible reasons:
The video is quite abstract and the AI doesn’t understand what a human might find interesting.
A conversation is happening in a clip and you want to jump the crop back and forth between the speakers, not focus on one speaker.
There are original graphics that get in the way of the crop.
With these things in mind, we built a Motion KeyFraming tool that allows you to set coordinates and properties at specific frames in the clip. This means you will be able to move the crop box across the screen at a pace that you control. You can also precisely control the zoom level at each KeyFrame and you can determine the path that the crop box takes as it moves from frame to frame. Is it as powerful as a desktop tool? In most cases, yes. The most important thing is that it’s really fast and easy to do, and you can do from your couch on an old laptop.
You can also set the kind of Easing you want between the Motion KeyFrames. So if you want to pan fast and then slow down, you can automate that by selecting a preset.
One other thing: you can use Motion KeyFraming in combination with AutoCrop, allowing you to tweak the automatic crops rather than start over and do everything manually.
We were recently chatting with a couple of video editors who were describing the process of scrubbing through 20 source videos from their client to find a few clips that the client wanted to use in a new project. It took them an entire day just to locate the clips and trim them.
We built Kamua AutoCut so you don’t have to go through that process.
AutoCut is also powered by AI. It looks for points in a video where the original editor made a cut, inserted a transition, or where there is some kind of change in unedited footage where an editor might insert a cut or transition.
AutoCut works automatically every time you add a video to a project. If you want to override the cuts, you can do that just by merging or splitting Shots.
And, if you use our AutoCaptions tool, you can quickly search a Transcript, click on the word you were looking for, and you navigate directly to the clip in the Timeline.
If you’ve ever worked on video compilations, you will also find AutoCut really helpful. It automatically de-compiles the original video and you can then add or remove or trim clips, then hit the render button to recompile everything.
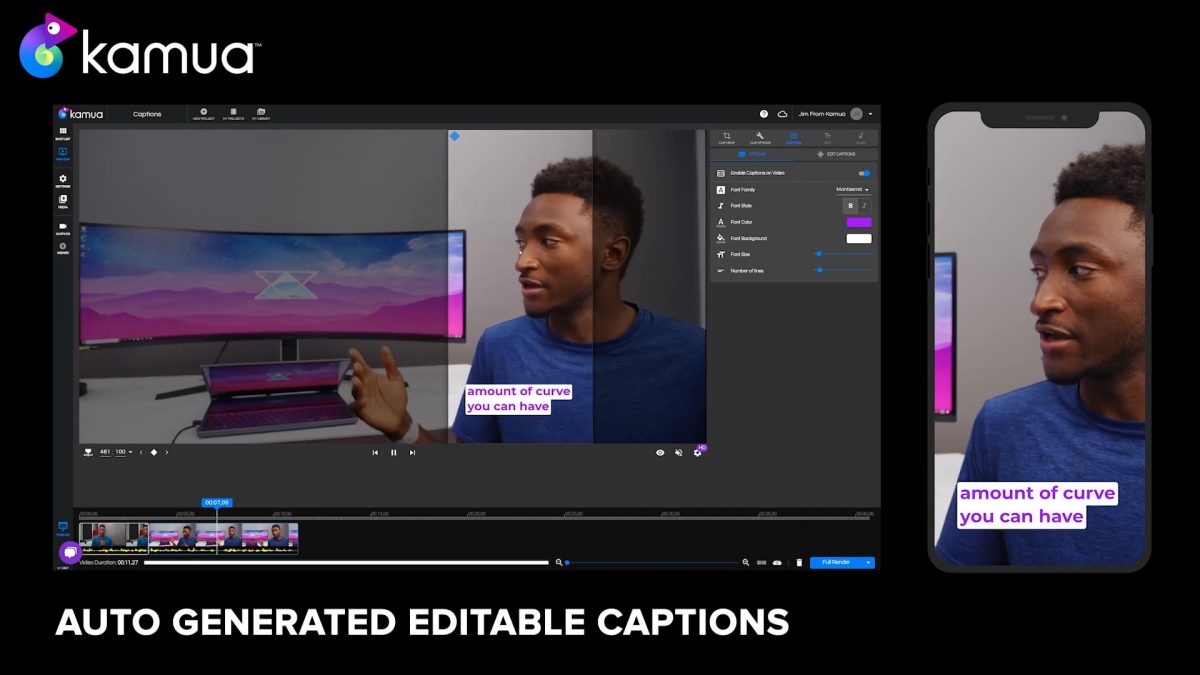
Writing out captions and subtitles is pretty tedious work for any editor. There are tools out there that automate some of that for you, but they require you to download an SRT file and then you have to get to work tweaking and resizing in your desktop NLE software.
Kamua AutoCaptions helps you work faster
Kamua’s AutoCaptions are also word-timed, meaning there is a timestamp behind every word in the transcript, so the words appear on the screen as they are spoken. If words are missing or misunderstood by the AI, you can manually insert, split or correct words, and you can then set the timing at which those words will appear on the screen.
At the moment, we don’t support Netflix-style blocks of subtitles, but we are working on bringing that to Kamua in the near future. That being said, you can download an SRT file that does have the subtitles in blocks, so you can pull them into an existing Project.
Motion KeyFraming plus AutoCaptions for quick generation of Stories
What is most useful for editors is the ability to have the captions automatically resize as the video is resized. So when you’re producing multiple aspect ratios, you just need to click one button to create each version.
Sometimes your clients commission videos and films that are shot in wide “cinematic” aspect ratios like 2.35:1. These look great on big screens, but cropping the content can be tedious, especially when you are required to mix the widescreen content with other video formats.
Removing black bars is an essential step if you are going to get the image to fit full-screen on a mobile phone or if you have to crop the image to fit into an ad that has dimension constraints.
Kamua’s AI scans each clip for the presence of black bars and then automatically crops those black bars out, saving you the time of having to do it yourself.
As of right now, there are some pretty standard color options that you can experiment with:
Hue
Brightness
Contrast
Saturation
Tint
We will be adding more presets and tuning them so you can quickly apply specific looks that you want to achieve in your videos, such as black and white, film noir, and so on.
We know that changing colors is nothing new, but this is just the beginning of our color tools. We plan to offer everything from rapid color grading and correction to style transfer using AI.
Perhaps the most important thing to you is that you won’t have to open up another piece of software to work with colors. We invite you to share your thoughts and experiences with us and let us know what you would like to see implemented next.
Fading in from, and fading out to, solid colors are standard video editing techniques, but they can still be pretty time consuming to do, not to mention the rendering/exporting time they require to process on your local machine.
So, we made it easy to apply fades to each individual clip, set the exact colors, and the duration of each fade, to help you get your projects done faster.
Just released! Powerful crossfading tools all rendered in our cloud so you can add use transitions that you’re used to seeing in the best desktop software, but all done online so you don’t tie up your workstation with rendering and exporting.
Here is a quick preview:
You need to render the project to see the transitions in effect. We will be adding a more detailed tutorial soon!
10. The Benefits of Working in a Web Browser in the Cloud
If you’ve ever thought to yourself, “if only I had a second computer right now I could get to work on something else while this project is rendering and exporting” leave us a comment below and let us know about things that you want to see in Kamua!
Because Kamua is browser based, you can work on multiple projects and multiple edits all in parallel. For example:
You just hit Render and it will take 10 minutes to complete: you open a new tab in your browser and start work on another project while the previous one is rendering in the other tab;
You want to try multiple edits of a project and be able to switch back and forth between tabs to see how different effects, crops and clip choices work for you;
You’re waiting on a client to get back to you, so you can keep their project open in one tab, ready to discuss their feedback, and you can start a different project in a new tab.
You want to upload multiple source files into a project, but you don’t want to wait for them to complete their processing, so you open a new tab and work on something else while keeping an eye on the progress in the other tab.
In addition to being able to work in multiple tabs, you can also take advantage of other cloud possibilities with Kamua:
You can send direct Output links (.mp4) to clients so they can view drafts or finished videos directly in their mobile phone. This is really powerful for when you need them to see the cropped video in portrait mode asap.
You can import Outputs straight into your Library in Kamua, instead of having to export, download and re-upload.
You can share your login with a colleague so they can pick up where you left off, even though they may be on the other side of the world (yes we know it’s always a security risk to share your logins with colleagues, but we’re also pragmatic and until we enable team logins, we’re not going to tell you to not share your login with people you work with every day and trust. Like with anything else, using common sense is a pre-requisite).
Think about how much of a hassle it is to pack up files and upload them, and hope that the other person has the same version as you, that nothing breaks or corrupts, and that their settings don’t mess up the final result. Time is the one thing that is really difficult and expensive to buy more of on this planet. Saving it is just as effective and a lot cheaper. We hope that you become a customer of Kamua so we can help you save time as soon as possible.
We hope you found these 10 feature sets useful and interesting and we look forward to hearing how you use them in your projects. If you have any questions for us, you can ask in the comments section here, or you can head over to our homepage and click the chat button to talk to one of our people.
Most of our support staff are also video editors, and you will find helpful articles on our Blog that are written by some of them. Check them out as well and let us know what you think!
Using Kamua you can clip videos, Crop them for social and enable AutoCaption for subtitles
According to a recent article by Axios, Instagram is fast becoming a major distribution channel for news and, more generally, information. IG is not alone in that regard. Social and sharing-oriented apps have been platforms for informational content for a long time. However, most younger consumers watch mobile videos holding the phone vertically, and some social video apps do not support flipping the phone sideways, which means that content that is filmed specifically for a desktop/TV audience must be cropped for a vertical mobile view.
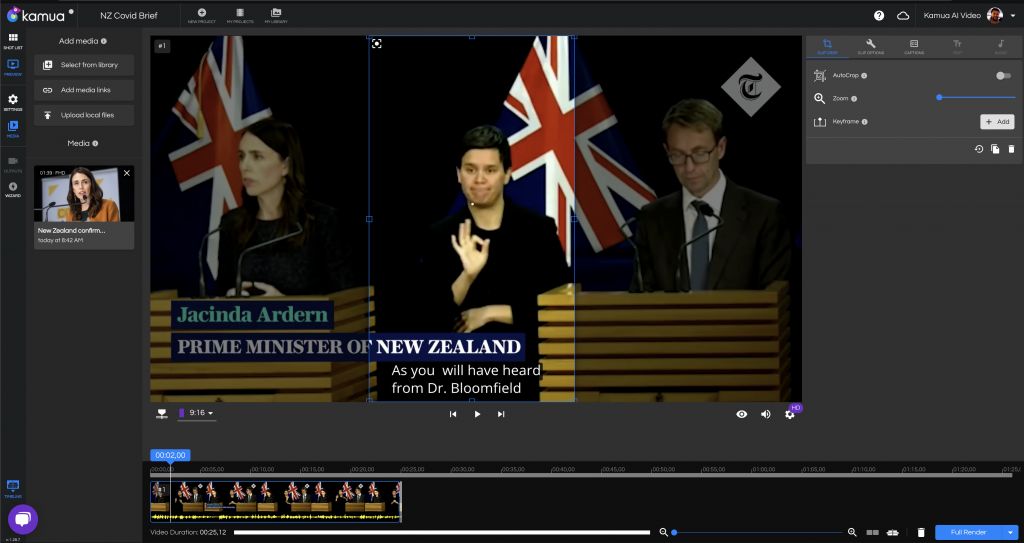
Cropping TV format press conferences can be a challenge.
If you are a large company with a lot of resources, you probably have a large full time editing team (hint: you can save money!) But if you are a smaller organization or a freelancer, you either have to edit video yourself or you have to pay someone precious resources to do it for you.
Instagram is in the midst of a transformation — what was once the place to share photos of food and social outings is quickly becoming a hub for information and advocacy.
Kamua helps journalists repurpose existing – and create new – content, for both mobile and desktop audiences, with some simple and powerful AI tools that cut and crop videos to the exact durations and sizes that journalists and bloggers need for different apps and websites.
Here’s an example of how a video made for TV and Desktop can be quickly repurposed for your Instagram, Twitter, TikTok, Snap, Facebook, Pinterest and followers from many other social apps:
You don’t need to spend hours downloading, uploading and learning difficult tools.
By using a couple of easy-to-learn features in Kamua, here is what we did just in a web browser:
Ready to upload as a Story to 10+ apps!
Linked the original video from YouTube so we can clip it under Fair Use
Enabled AutoCaption to generate the transcript for the video
Used a simple Crop tool to choose the part of the screen that we want to include in our 9:16 portrait story
Note: the author of this article who created this video has no video editing background.
– The Author
And after a couple more simple tweaks, which you can easily learn in our tutorials, here is the resulting Story on the right.
In as little as five minutes we were able to create a story that we can share with our readers and audience about the status of Covid-19 in New Zealand, straight from their leader. It has colorful captions that also let people know what’s happening even if they have the sound turned down or off.
Using Older Footage That’s Still Very Relevant
While Covid, the US Presidential Elections and Big Tech dominate the headlines, stories from the past are very much relevant to what’s happening today.
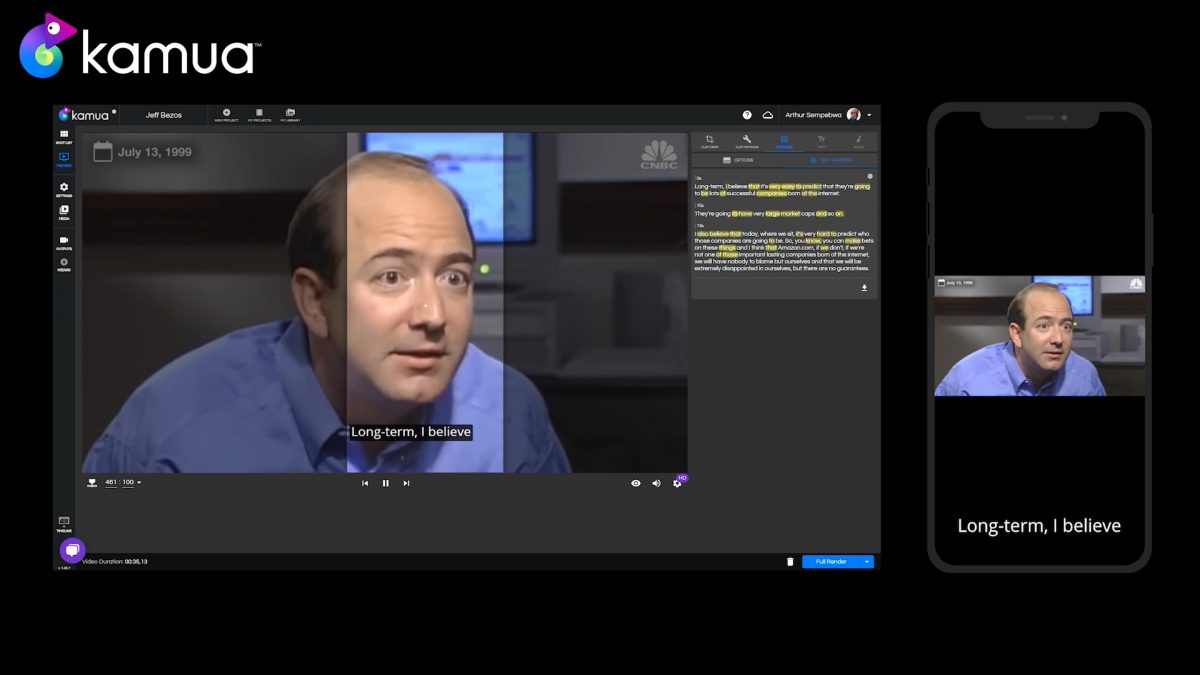
Jeff Bezos predicted many things in 1999
Using Kamua to repurpose content makes it fast and easy to build up a series of Stories using segments from press conferences and other content that you want to share with your audience.
Using AutoCaption to search for Keywords
Big companies have budgets and armies of interns for searching the transcripts of videos for key words and phrases that are newsworthy. That is both expensive and time consuming, and not really an option for freelancers and smaller organizations.
So, we made AutoCaption searchable. Here’s how it works:
You don’t have to have a video editing or technology background to use something this simple. Once you’ve located the segment you are looking for, you just trim the clip to the duration you need and then you can crop it to resize it or add another clip after it.
What if I Shoot Videos Myself?
A lot of journalists shoot videos of themselves at home, either for the outlet they work for, as a contributor, for syndication, or for their own distribution.
You can use Kamua to edit and also repurpose this content, even if it has some graphics burned into the screen.
How to turn a CNN piece into a personal video call
All we did in this edit was use the Kamua AutoCrop feature and set the zoom level to be just enough to avoid clipping the burned-in graphics on the screen.
We trimmed off a short segment at the beginning and we still have a lot of the video left to produce at least another 10 stories.
Breaking longer videos up into chapters is a great way to get the most out of different mobile social apps, which all have different maximum video lengths and different algorithms that determine which content to recommend to which users at any given time on various devices.
And, even though this video was filmed horizontally, it feels like a personal video call, and that’s a great way to connect with audiences without having to film and edit all over again.
We also offer tools that you can use to manually override or fine tune the choices that our automated AI makes, and you can even copy and paste in text if you want to put something different over the top of the video.
What about Videos where the Subjects are Moving around Outdoors?
Kamua loves movement and action! Whether you’re a sports reporter or a tech journalist who covers electric cars, Kamua’s AI can help you create and repurpose video content really easily.
The result looks like it was filmed by a mobile videographer, rather than a robotic cut-down of a YouTube video, right?
It’s important for mobile viewers that the content looks authentically produced for a mobile audience.
If you would like to know more about Kamua and read up on the specifics of our features, head on over to our Knowledge Base and take a look.
These articles in particular may be a good starting point for you:
On our Homepage you will find a chat bubble in the bottom left corner of the website. You can open that up and chat with people from Kamua and we will be happy to assist you.
Let’s face it, there’s a lot of great content being produced out there and it can be daunting to find ideas, let alone stand out from the crowd. Sometimes I watch Zach King’s videos with my jaw on the floor—questioning what I’m doing with my life. But there’s hope. Sites like Pinterest are a great resource for Motion Graphic ideas and concepts. So, if you ever find yourself struggling for ideas, go take a deep dive into a world of photo inspiration and get those creative cogs turning.
Let’s get tracking 😎
Watch the tutorial below and take a deep dive with me into Motion Tracking and animating paths.
Tutorial Key Points 🤓
1. Track your footage: • Select your footage in the timeline. • Go to the Tracker panel and select Track motion. • Place the Tracking box where you want After Effects to track the movement and adjust accordingly. • Analyze forward.
2. Use a Null to parent all the assets you need tracking: • Right-click on the timeline, select New and choose Null Object from the drop-down. • In the Tracker panel choose Edit Target and select the Null. Click Apply and accept the X/Y dimensions.
3. Draw and Parent your shape layer: • Select the Pen tool and start drawing out the shape you want. Trace over a reference image if it helps. • Parent your shape layer to the Null. Simply grab the pick whip tool from your shape layer and drag it onto the Null layer. • Adjust the positioning of the shape layer to where you want it.
4. Trim Paths • From your shape layer drop-down menu, select Add in the Contents row and choose Trim Paths. This will help you animate your shape path. • Under Trim Paths, make sure both the Start and End values are at 0.0%. Add a keyframe on Start from where you want the animation to begin and another where it should end. • On that last keyframe for the Start value, increase it from 0.0% to 100% • Playback and add additional keyframes to control the speed if needed.
5. Light to dark • Use the pen tool to create a mask around the layer you want to go dark. • In the mask options for that layer, increase the feather to soften the mask. • Select Tint from your Effects panel and change the colour white to any colour you think works best for that shot.
Practice by playing 💡
To get better with Motion Graphics is to allow yourself to play with ideas. Use the techniques from the tutorial to create something new, something weird and something simple. Some ideas work better than others but that’s all part of the game. The important thing is to get comfortable with the software and you only get there if you practice and play.
Custom Tracking in your browser 🤯
Motion Tracking is a very useful technique to use in After Effects. We also believe it’s extremely useful for video repurposing—so much, that we built our own Custom Tracking tool you can use in your browser. Yes, that’s right…in your browser😎.
Hey, why not try it out for yourself—just sign up on our home page and request access. Get ready to have your mind blown by how much time this powerful tool will save you. Check out this great guide to learn more about Custom Tracking.
Did you find this post helpful? Please drop us your thoughts in the comments below and consider subscribing to our YouTube channel for more helpful tips and tricks on how you can get more and better video done, faster.
About Us:Kamua is a technology startup headquartered in London with engineering operations in Bucharest. With Kamua you can cut, crop and repurpose videos faster, all in a browser, assisted by our AI.