


CONTENTS: Watch Tutorial | Key Points
2020 was the year of virtual insanity. On-demand streaming skyrocketed, everyone wanted to Zoom and even Gordon Ramsey started dancing on TikTok. Yes, things got weird.
The world was officially on lockdown and ”bored in the house-bored in the house bored.” This was a great time to get creative! So, I decided to get some fresh air and do what every video editing Jedi does on their break…dance in the street to a Jamiroquai classic of course.
Let’s learn some masking 😎
I created this video in After Effects, but you can do this in Premiere Pro or any other editing program you prefer. Please watch the tutorial below and follow along as we take a deep dive into all things nerdy.
Tutorial Key Points 🤓
1. Plan ahead: I believe this is a relatively easy technique for you to learn, even if you are just starting out in After Effects. However, take some time to really block out your shots. Get creative—have some interesting actions you can perform to make your video stand out from the rest. Editing really is easy the part.
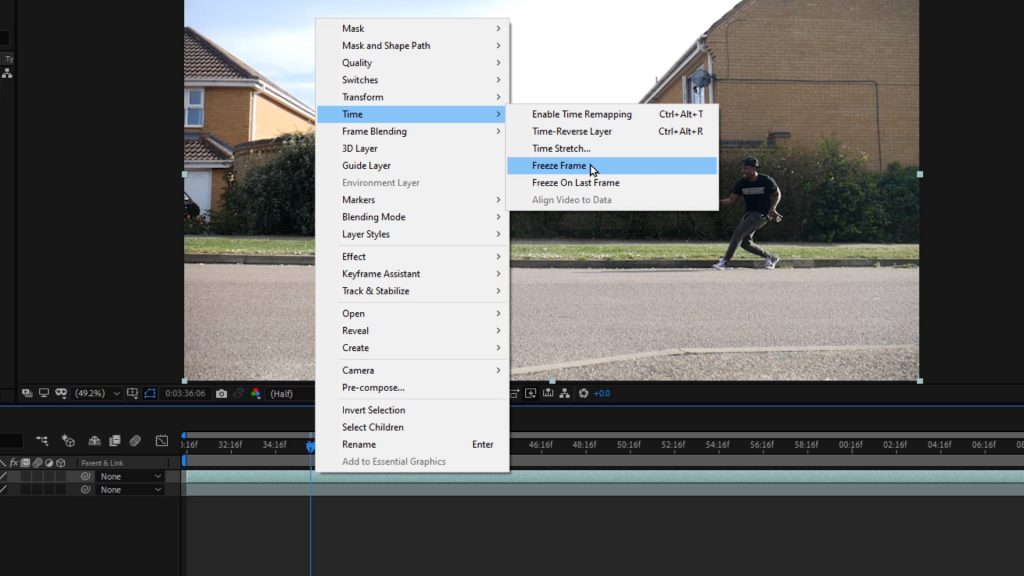
2. Duplicate and Freeze: Once your footage is on the timeline, duplicate that layer (Ctrl+D for PC & Cmd+D for Mac). Right-click the duplicated layer on your desired frame, head up to ”Time” and select ”Freeze frame”
3. Pen and Zoom: The duplicated layer will now be frozen. It’s now time to put the work in my friend, this part will take some time. Head up to your tools, select the pen tool and start drawing a mask around your subject. Be sure to really zoom in for this. Use the hand tool/spacebar to help you navigate the screen.
4. Trim and Repeat: Once the mask has gone full circle, you should be able to see the original below it. Now, trim the duplicate layer from the point you want it to dissapear (Ctrl+Shift+D for PC & Cmd+Shift+D for Mac). Play back what you have so far and watch your progress. Make adjustments if need be & get ready to it all over again😁.
Always duplicate from your first layer (the unfrozen layer).
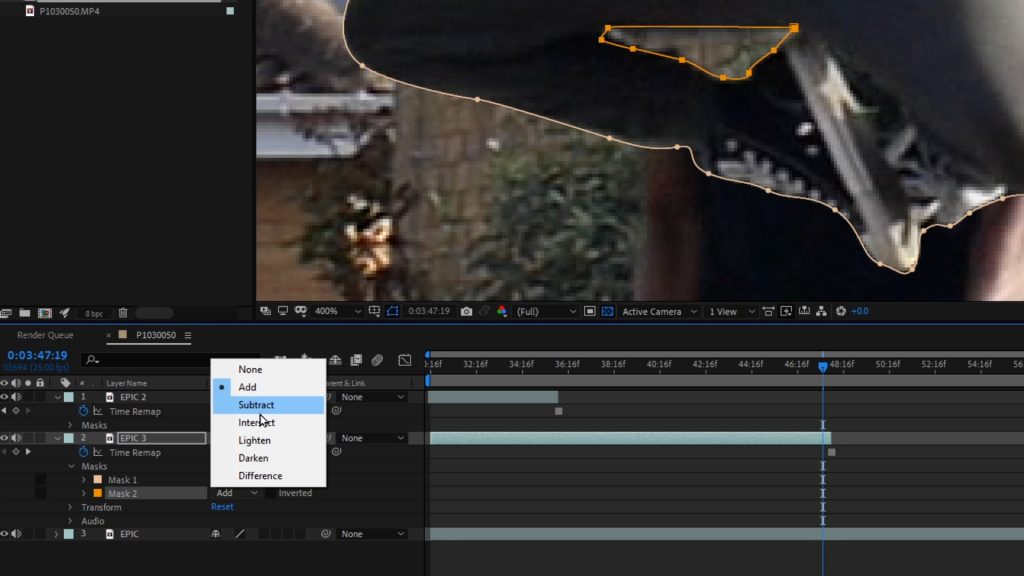
5. Mind the gaps: Make sure you also mask out the sections that reveal the unfrozen layer. Select the frozen layer again and draw another mask. This should automatically display as another colour. Click the drop-down on that layer to reveal the masks, head to the second mask, select the ”Add’ drop-down and choose ”Subtract”.
6. Change to square: The last thing I did to make it pop was change the aspect ratio of my final edit from 16:9 (1920×1080) to 1:1 (1080×1080). This allowed me to just keyframe the position of the video from left/right and even zoom in/out for that dolly motion effect. This is the secret to the magic! You can even add some fake camera shake on there—just play and have fun with it.

That’s it! Try it out and don’t be afraid to push it further: innovate, get creative. Please share with us what you come up with, we’d love to see it 🙌.
Did you find this post helpful? Please drop us your thoughts in the comments below and consider subscribing to our YouTube channel for more helpful tips and tricks on how you can get more and better video done, faster.
About Us: Kamua is a technology startup headquartered in London with engineering operations in Bucharest. With Kamua you can cut, crop and repurpose videos faster, all in a browser, assisted by our AI.