

☕️ TL;DR – Your Outputs are the rendered versions of your videos which appear after you hit the “Render” button.
In this article you will learn:
- How to Render a Project
- How to switch between Full, Draft and Multi Render
- How to use the Output Screen
How to Render a Project
When you want to convert your video from a Project into a video you can share or download, head over to the Render menu on the bottom right of the Timeline.

You will be able to:
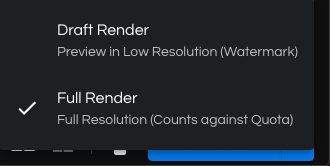
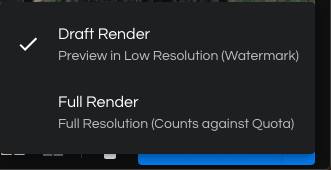
- Draft Render: Lower Resolution, Watermarked video that does not count against your Monthly Quota
- Full Render: Highest Available Resolution, No Wat0rmark, Counts Against Monthly Quota
- Multi Render: Select and customize multiple Aspect Ratios for rendering
Pro Tip: If you originally uploaded a 4K or 1080p video, you will notice that your working files are in 720p or 320p. That’s to speed up working in a browser. However, when you hit Full Render, your Output will always be rendered in the highest possible resolution based on the original Source Media. So a 4K video that you linked or uploaded will render out as a 4K .mp4 file.
Render does 2 things (both Draft and Full Render):
- Saves a version of your current Project, so that all of the edits you made and settings you applied in that Project are accessible in the future, as long as you don’t delete the Render/Output.
- Processes your Project from an edit into a video, at the highest resolution possible based on your Source Media.
Good to know: A Render acts as a saved file. You will always be able to access that saved version through the Outputs Screen.
How to switch between Draft and Full Render
On the right side of the Render Button. There is a drop-down menu which you can change the output quality between a Full Render, a Draft Render or Multiple Render.
Full Render

A Full Render will process your media at the highest resolution based on your Source Media without a watermark.
Each Full Render will count towards your Plan’s Quota.
Draft Render

The Watermark can be removed in the Outputs screen. You can choose to remove it when you are happy that you want the full resolution, as it will count towards your Plan’s Quota.
Multi Render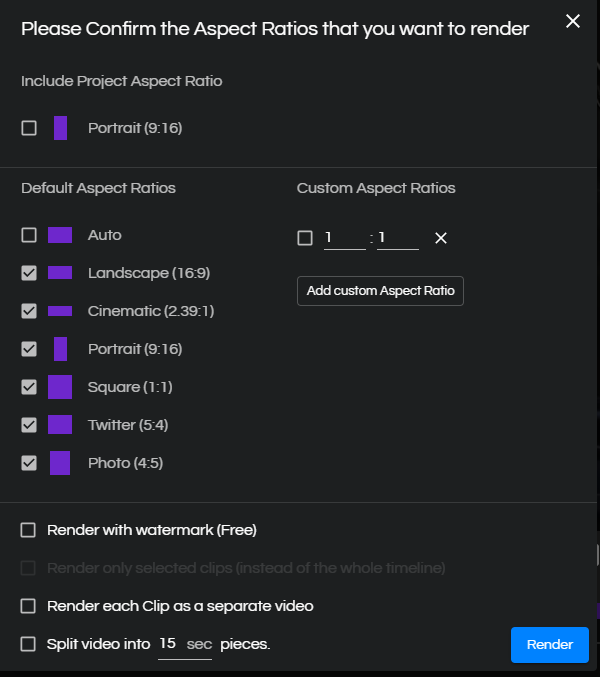

Multi Render helps you batch process your outputs. Before you render, simply select (tick box) your desired aspect ratios or customize your own. These will process and be available on your Outputs screen.
From here you can also choose to Render each Clip on your Timeline as a separate video or split your video into pieces by setting the duration in seconds.
Project Outputs Screen
When you render your project, you will be taken to your Project Outputs screen. You can also access this screen at any time from Left Nav Bar by clicking on the Outputs ![]()

Back To Project – This will allow you to edit your most recent project.
Preview
To preview an output simply click on the output you want to view.
Other options include:
- Download – Downloads are only available for Full Renders. Full Renders and Downloads will count towards your Plan’s Quota.
- Download as a Gif – Draft Renders will allow you to download your output as a Gif.
- Edit an Output – Editing an output will allow you to edit a render with all of its Sources and Clip Settings.
- Share Result – Copy and share a link of the output or scan of the QR code with your phone to go directly to the video link.
Heads Up: Editing an output will overwrite your most recent Project and its Settings in this particular browser tab (you can have more than one browser tab open with Kamua at any time). So, if you click the blue Edit button, it’s going to load the Settings for that particular Output, including the Clips, the Aspect Ratio, KeyFrames and anything else you did to produce that particular Output.
Output Hover-Over Menu
Hovering over on the top right corner of an Output, you will see 3 dots appear. Clicking those dots will drop down a menu with additional options.
- Render Full version – Convert the Draft Output into a Full Render.
- Import to Media – Importing to Media will make your Output available in your Media Library to be used as a Source in a New Project.
- Edit from Here – Edit the output. This will overwrite your recent project and settings.
- Delete – Delete the selected Output
- Show Frame – Preview what your output would look like on mobile and social media by choosing from the list of popular social media overlays.